Creating a standup
Detailed instructions on how to create and launch a standup in AssistBot
It is impossible to create a standup without a template. If you haven't created any templates yet, please read the relevant article.
To create a standup, you need:
- Got to "Create" > "Create standup";
- Make sure that you are in the "Standups" section:
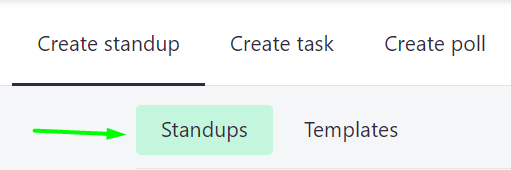
- Click on "Create standup" button.
- Select one of the following options in the opened window:
- Create new template - select this option if you want to create a new standup template with questions. Then before creating a standup you will be redirected to a new template creating;
- Based on ready-made template – select this option if you have already created the required template.
In our example, we will create a standup based on a ready-made template:

- Choose a template for this standup. If you chose "Create a new template" on the previous step, this field will be already filled in;
- Enter standup name. The name will be visible only to company administrators and allows to easily identify the standup in the admin panel. When you select a template, this field is automatically will be filled;
- Select departments that will receive the standup. You may select several departments. Instead of or together with departments, you can also select certain members (next item);
- If desired, add individual members of the company who will participate in the standup. The added members will be displayed in a separate "Individual members" department in analytics;
- Select the frequency of the standup launching. The standup will be launched according to the selected frequency on the days specified below. If "One time" is selected, the standup will launch once and then be automatically deactivated;
- Select the days of standup launching. The poll will be launched on the specified days according to the selected periodicity from the previous step;
- If desired, check the "Take work start time of each member" if you want to launch standup at the working days start time specified in the personal settings of members. It is recommended to use it only if you are sure that all members have configured their time correctly;
- Set the "Standup launch time". This option will be active only if feature at the previous step was not enabled;
- If you want to get anonymous reports for this standup, select "Anonymous standup". In this case, you and other company managers who have access to view the reports will not be able to see the names of members in analytics section. Note: this option is only selectable during creating a new standup;
- If you need to delay the start of the standup for several days, weeks or months, set the "Standup launch date" later than today. The standup will start according to the schedule settings after the date specified here;
- If desired, select "Channel for results". You will be notified in the selected messenger’s channel whenever members submit a reports. The channels must be connected to the company. Read the relevant help section;
- If desired, check the "Show blockers in channel". This option works only together with the previous step. By default, answers to blockers will not be displayed in the channel. Check this option if you want to enable displaying answers to blockers;
- If desired, check "Get email when each report has been submitted". You will receive email notification whenever members submit a reports. Do not forget also to enable the appropriate option "Get standups and tasks reporting alerts" in your personal profile settings. This feature is available in paid tariff plans;
- If desired, check "Get weekly summary digest". Every Monday you will receive a summary report of the past week's data for this standup. Do not forget also to enable the appropriate option "Get standups and tasks reporting alerts" in your personal profile settings. This feature is available in paid tariff plans;
- Set the "Allowable limit of members response time". After this time, the system will not accept responses from members. Set 00:00 if you do not want to limit the waiting time. Keep in mind that even if there is no limit, the system will not accept responses after 24 hours;
- If desired, check "Take working days of each member". If activated, the standup will be sent to members only on those days that were specified in their personal settings. It is recommended to use only if you are sure that all members have configured their working days correctly;
- If desired, check "Take vacation days of each member”. If activated, the standup will not be sent to those members who are on vacation. It is recommended to use it only if you are sure that all members have set their vacations correctly;
- If desired, check "Take time zone of each member". If activated, the standup will be sent according to the time zones specified in the personal settings of members. It is recommended to use it only if you are sure that all members have set their time zones correctly. Remember that if your members living in totally different time zones, you will receive all reports for the day only after the astronomical day in all time zones;
- Click on "Save" button;
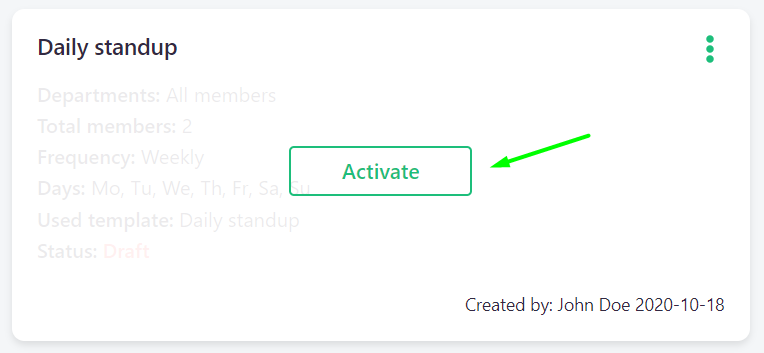
- To start a standup, activate it:
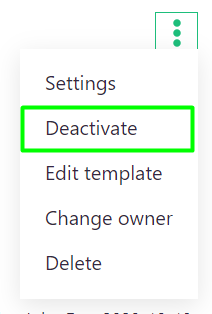
You can deactivate the standup from the context menu at any time:
Keep in mind that standups are launch once a day. For example: you have created and activated a standup that will be triggered at 12:00 today. After starting the standup and submitting reports, you decide to change the time to 14:00. In this case, the standup will not start again today. It will be launched only the next appointed day at 14:00.